Knowlege Base Results
Your results are below, click an item below to expand it and see the answer.
Unless otherwise specified in the contract here are the standard payment terms:
- Smart Sites: Recurring billing needs to be setup before any work is started
- Custom Web Design: 50% at start of project and 50% when the website is launched
- Logo Design: 50% at start of project and 50% when the final logo is complete
No they will not. We have no contact with your client whatsoever. All emails are sent directly to you (never to the client) and we do not put any references/links to us on any website we create for your clients.
We are your behind-the-scenes web design team.
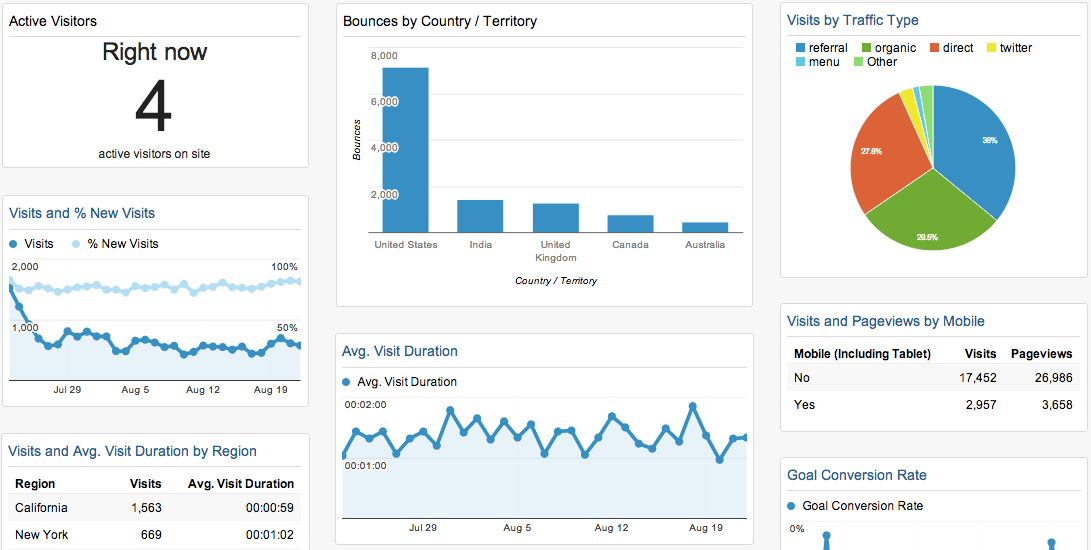
View PermalinkGoogle Analytics shows you website visitor traffic stats like how many came to your website this month, how long did they stay, what pages did they visit and more!
A typical Google Analytics report contains a lot of information and looks like this:
While Google Analytics is free, you’ll need to open a Google Analytics account by going here, adding your website and generating tracking code. Send us that code and we’ll embed it on every page of your website.
View PermalinkG Suite is a set of cloud services by Google. It’s a services used by businesses and includes a shared calendar (keep everyone on the same schedule), shared documents (create and edit documents online), chat features (stay in touch) and most importantly branded email accounts… this means that you can have lots of email address at your domain (example: jimmy@jimmyspizza.com OR sales@acmeinc.com). All these services are powered by Google so they are very well supported and work with just about every device.
Pricing (as of 1/16/2019) is just $5 per month for each account (email address) you want.
You can buy as many accounts as you want or just have one.
You can read more about G Suite and signup by going here: https://gsuite.google.com

View Permalink
A “captcha” helps prevent SPAM form submissions from being submitted by requiring the website visitor to type in a few characters into a box before being allowed to submit the form. They sometimes look a bit different but for the most part, they look something like this:

The most popular captcha is reCAPTCHA and it is owned by Google. If you want to use Google reCAPTCHA in your website Gravity Forms you’ll need to generate a set of keys, follow these instructions:
STEP 1:
Make sure you are signed in to your Google account then click here to visit reCAPTCHA
STEP 2:
Click on the + symbol to create a new set of keys

STEP 3:
Give it a label (just use the site name), select reCAPTHA V2, “I’m not a robot” checkbox, enter the domain of the website where these keys will be used, accept the terms and click the SUBMIT button, like this:
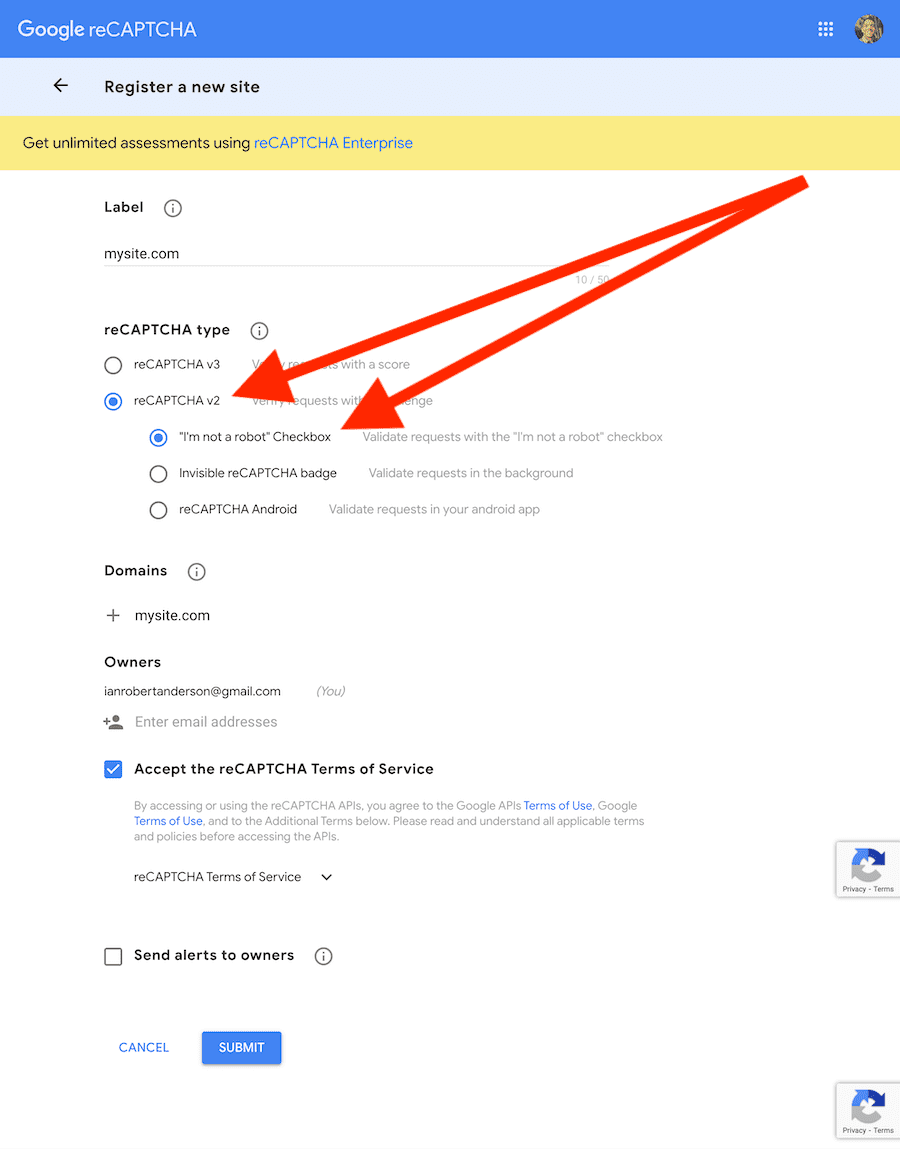
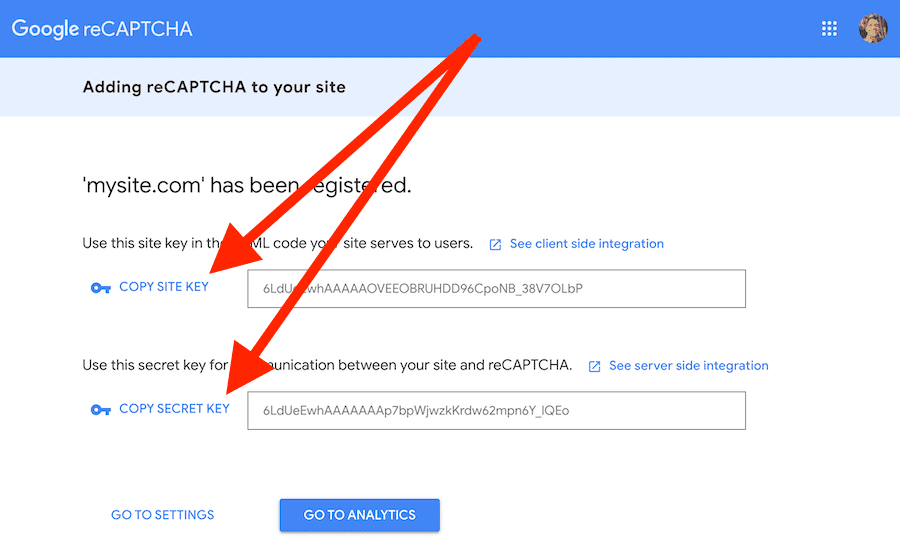
STEP 4:
On the last screen you’ll see a set of keys, one labeled SITE KEY the other labeled SECRET KEY, copy both of those and send them to us.
If a client chooses not to host with us, the two recommended web hosting companies are:
- HostGator
- WP Engine
We use the most powerful, most supported, most SEO friendly and most widely used CMS. It is called WordPress. It’s simple to manage page/post content, making it easy for the end client to use.
Working with us, you’ll also receive access to our new, non-branded video that shows your clients how to manage their new website.
View PermalinkIf you are seeing a 500 Internal Server Error or Error connecting to database this means that the server that hosts your website is experiencing an issue.
Typically these type of errors resolve themselves within 30 minutes or less. If the error does not resolve itself and the website is not hosted on one of our servers you will need to report the issue to the company that hosts the website.
View PermalinkSome photos work well in some places on a website and other photos will not. Most of the time this comes down to the orientation of the elements within the photo. There are two types of orientations in photos, either Portrait (aka: Tall, Vertical) or Landscape (aka: Wide, Horizontal). Here is a diagram of each:

Knowing the orientation of your photo AND where it is going to be used is very important in choosing photos for your website. Here are some examples:
This is a PORTRAIT photo of the Eiffel Tower:

Notice how the Eiffel Tower fills the middle of the photo from the top to the bottom of the photo? That means this photo would work great in locations where a tall, skinny image is needed.
However, if you needed to place that Eiffel Tower photo in a location that is more of a “Landscape” shape (like a banner), it would need to be cropped to fit into that space (which means only displaying a slice of the photo… removing the top, bottom or middle section).
For example, it could be cropped like this:

to get the middle OR like the image below (getting the top):

Notice how major parts of that photo need to be removed to fit a portrait photo into a landscape shape? Imagine this is a photo of a bunch of peoples, their heads will get cut off!
A better way to display an image of the Eiffel Tower in a portrait shape would be to use a photo that was taken MUCH further away so that the entire structure would fit into the horizontal middle of the photo. Like this:

However, if you were going to use the photo in a banner that would grow/shrink with the width of the browser the above photo would still not work as the top and bottom would still get cutoff. A better idea for a banner photo would be a true LANDSCAPE photo of Paris like this one:

Because all income we receive is paid through PayPal, it is PayPal who automatically issues us a 1099 for the year (it’s actually a 1099-K). The 1099-K that we receive from PayPal includes all income that we’ve earned throughout the year and is what our accountant uses for our tax returns.
If your accountant needs additional info, we recommend sending them this link to PayPal which provides more info about 1099 K: https://www.paypal.com/va/smarthelp/article/how-does-paypal-report-my-sales-to-the-irs-will-i-receive-a-tax-form-1099-k-faq729
Also, if you take a quick look on this CPA’s site, at the top of the page (second paragraph) it provides an explanation of why you do not need to issue us anything. https://amynorthardcpa.com/paid-contractors-via-paypal-need-issue-1099s/
View PermalinkGoogle offers a great platform for businesses to communicate easier (like Google Voice) and be more productive (like Google Drive), one of the most useful tools is the email service. Imagine your business email (bob@mysite.com) with all the tools and feature that a Gmail account has… that’s Google Workspace. It’s so good that we use it for our business and it is the only email service we recommend.
Here are a few answers to commonly asked questions:
Migrating to Google Workspace
- You probably already have your business email with another provider so how do you migrate it over to Google Workspace? Easy! Depending on where your email is coming from (Exchange, Gmail, IMAP, etc…) the process will be slightly different so we recommend you review THIS support article about migrating to Google Workspace.
What about storage?
- Google Workspace uses a storage model called pooled storage that’s shared by all the users in your company. For each new user you add, your pooled storage increases based on your Google Workspace subscription. The standard plan offer 2 TB (terabytes) and the Business Plan offer 5 TB.
How much is it?
- Google offers a few plans but for most businesses the cheapest plan will probably work fine and it only costs $6 per month per user. This means that if you want to have 3 employees with their own account, you would be paying $18 a month to Google. If you need more advanced features or more storage you can upgrade to $12 or $18 per month per user. You can learn all about pricing HERE.
What happens to my existing email
- Once the migration process is complete you can still access the data in your source account (like Outlook) because all migrated data is copied, not moved or deleted. Learn more about the migration service HERE.
When emails are not being by the server and you’ve tried everything else… the last course of action is to setup a SMTP email server. This is basically an email account that sends emails. While it sounds simple, it’s a very complex thing to setup, however here are the basic steps:
- Create a new Gmail account to be used for sending email
- Install THIS PLUGIN
- Follow the instructions on THIS PAGE
View Permalink
If your client has a lot of frequent website updates / changes that they need help with, they may want to consider purchasing prepaid time. This will save time negotiating price, sending invoices, paying invoices, etc…
Prepaid blocks of hours may be purchased in any five (5) hour increment (example: 5, 10, 15, etc. hours) at the rate of $60 per per hour. Prepaid time is valid for six (6) months from the date it is purchased.
View PermalinkThere is no 100% accurate way to always deliver all emails to all inboxes.
Different email clients, different spam filters, different virus protection and different devices all play a part in emails being delivered properly and all of those things are out of our control. However there are things that can be done to increase the chances that it gets delivered. This FAQ will go through some of them, please follow these steps.
ENTRIES ARE NOT LOST: If the form is powered using Gravity Forms (and most are) the client can review all form submission by logging to the site admin area and going to Forms > Entries. The website records all form submissions in the admin area so even if the client does not receive it in the inbox, they can look at the information through the website.
#1 The first thing to do is to check to see if the form is SETUP correctly… more than likely it is but you should start by doing this:
- Login to the admin area and find the form in question – it’s either located under Forms in the admin area (which looks like THIS) or it’s an on-page form so you’ll need to edit page and be in Page Builder mode (which looks like THIS).
- Either way, when you edit the form look for a “Send to email address” or a “Notifications” email address and verify that your clients email address is in that box and is spelled correctly. If it is not, enter in their correct email address, save the changes and submit the form.
#2 Assuming the correct email address is in the Send to / Notification field, now you should test to see if the form is sending emails at all. To do that follow these steps:
- Remove your clients email address from the field and put YOUR EMAIL ADDRESS in that field
- Save the changes (publish the page if it’s an on-page form) and then go fill out the form
- Check your email (and check your junk mail) and look for the notification email
#3 Did YOU receive the notification email?
If YES, the email the problem exists on your clients end. Now you should put back their email address in the form ‘Send to’ settings (so your client will be receiving form submissions again) and now you need to find out what email client they are using (Outlook, Gmail, etc…). Once you know that, give them instructions on how to “whitelist” (add that to their Contacts or Safe Senders list) the “From” email notification address and try filling out the form again. Do a google search for their email client (example: Outlook) and “whitelist an email address” for instructions on how to do that.
Once you put your clients email back have them test it again. If they are still not receiving the email… tell them to temporarily disable their antivirus / firewall and try again. If they are still not getting the email address, tell them to open a new free Gmail email address and they’ll need to use that to receive website form submission.
If NO (did you check your SPAM folder?) this means the form/website is not sending out emails at all. This is the least desirable problem, this means that extra work needs to be done on the site/form. Please let us know and what we’ll try to do is to configure what’s called an SMTP Email Server… that is just a fancy way of making the form send emails through a different email system (most of the time we use Gmail for this). This process takes about an hour to setup and configure.
View PermalinkWebsite Updates / Maintenance Invoices
If the payment for website updates and / or maintenance is more than 15 (fifteen) calendar days past the agreed upon due date (and/or when the invoice has been sent) a late fee of $29 will be added onto the outstanding invoice.
Hosting / Smart Site Invoices
All websites that host with Department 727 (including Smart Sites) and are paying by the month must be set up as a recurring monthly payment via PayPal. Should PayPal not be able to process a monthly payment due to insufficient funds it will automatically try to reprocess the payment every 5 (five) calendar days from when the original date the payment was scheduled to process. If after 15 (fifteen) calendar days past the scheduled payment date, the payment still isn’t able to be processed a late fee of $29 will be added onto the outstanding invoice.
View PermalinkIf hosting or Smart Sites payments are more than 30 (thirty) calendar days past due, the website will be suspended for non payment and will incur at $50 reactivation fee.
When a website gets hacked sometimes the damage is obvious such as content / ads that weren’t added by the website admin displaying on the site OR the site may be down completely. Other times when a site gets hacked the damage isn’t visible on the front end of the website.
So if you think your website may have been hacked, the first step is to determine if it has actually been hacked. This can quickly and easily be done by running the website through a malware scanner.
Here are links to free malware scanners:
https://sitecheck.sucuri.net/
https://www.siteguarding.com/en/sitecheck
Simply enter the url of your website into the box provided and click on scan. Within a few minutes you’ll see the results of the scan and will be able to determine whether or not your website has been hacked.
Malware Removal Services
If you website has indeed been hacked, you’ll need to hire a company that specializes in malware removal. Here are two options that we recommend to get the website cleaned and restored as quickly as possible.
Option 1: SiteGuarding
To get the restoration process started, click this link https://www.siteguarding.com/en/services/malware-removal-service and scroll down the page until you see the Malware Removal Service & Code Analyze form.
You can either sign up for the Malware Removal Only service which is $49.95* or The High Priority Malware Removal service for $109.95*.
The difference between the two is that the Malware Removal takes up to 24 hours for the site to be cleaned and the High Priority cleans the site within 3 hours and if the site is blacklisted it submits removal requests anywhere the site is blacklisted.
*The above prices reflects what the company was charging as of 1/6/19.
IMPORTANT: In order to submit the malware removal form, you will need to enter the FTP credentials for your website.
Option 2: Sucuri
Sucuri is another good option to use for Malware removal https://sucuri.net/website-security-platform/malware-removal. Starting at $199.99* for the year, it is pricier than the other company, however, the price includes website monitoring and malware removal for one year. Whereas the other company only provides 14 days of website monitoring.
*The above prices reflect what the company was charging as of 1/6/19.
View PermalinkSometimes your website will have an error and you will not be able to do certain things in the admin. Maybe you can’t login because of a broken plugin. Maybe you just can’t upload a plugin through the admin area. Whatever the problem is, if you need to FTP a plugin to your WordPress website please follow these instructions:
NOTE: If you are using cpanel launch File Manager and follow these steps.
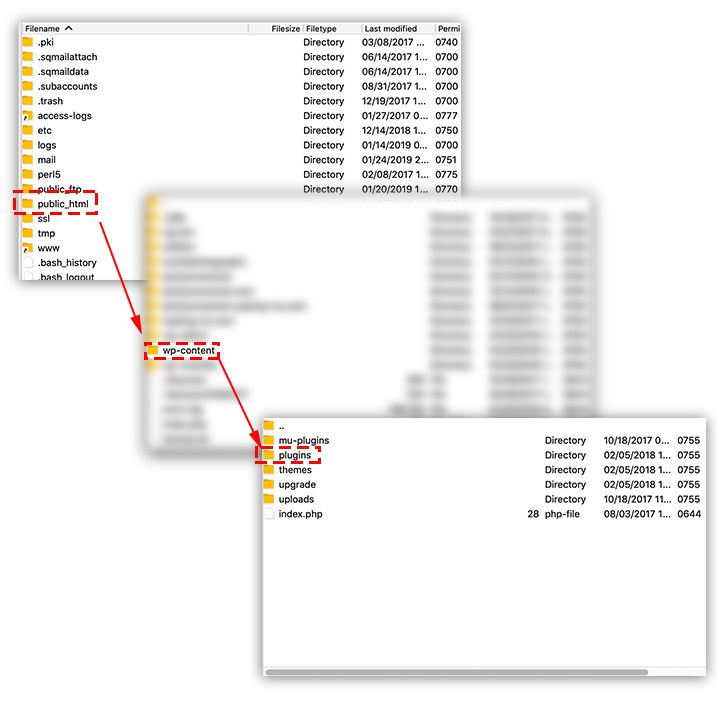
STEP 1: Navigate (by clicking on folders) to the plugins folder by going: public_html > wp-content > plugins
STEP 2: With the /plugins folder open in your FTP program, you will see a list of plugin folders… identify the folder of the plugin you want to overwrite. Double-click that folder to open it.
STEP 3: Delete all the files/folder within that folder (don’t delete the enclosing folder… just the files/folders within it).
STEP 4: Extract the .zip file on your desktop which contains the new version of the plugin you want to upload. Once extracted, open the folder and you should see at least one .php file and some plugin (you might see more).
STEP 5: Drag and drop (or browse, depending on your application) the new files from your desktop into your FTP program so the new files will be uploaded directly into the newly emptied folder on the website.
View PermalinkIf you want to know how big a website is, you’ll need to generate a sitemap. A sitemap is a list of valid URLs in a website, this could include pages, posts, pdf’s, categories, etc…
There are many free online sitemap generators, the one we recommend is the XML Sitemap Generator… when you generate your sitemap download it as a Text Sitemap.
View PermalinkTypically the menu entries on a website’s navigation consist of links to the pages of the website. However, there may be times that you want to include a link to something other than a page, such as a pdf. The first step to make that happen is to upload the pdf to the website.
Here are the steps on how to upload the pdf:
- Login to the admin area and mouse over Media and then click on Add New.
- Then drag the pdf from you desktop into the box that says Drop Files Here.
- Now the pdf will appear in the media library.
- Before you exit the media library, click on the pdf and copy the url that appears in the File URL box (you can find this on the right hand side of the screen),
Once you’ve copied the file url of the pdf, it’s now ready to be added to the navigation menu.
How to make the pdf display in the navigation:
- Click on Appearance > Menus.
- Then in left hand menu of options click on Custom Links. This will display two fields (URL and Link Text.)
- Paste in the file url of the PDF in the URL field and then type in the name that you want to assign your new menu in the Link Text field (For example: 2019 Policies)
- Then click on Add to Menu. This will add the new menu entry to the bottom of the existing navigation.
- Simply click on the new menu entry and drag it into the spot that you’d like it to appear in.
- Click Save Menu.
View Permalink
To learn more BackupBuddy (including requirements, tutorials,etc…) please go HERE.
If another provider will be migrating the website to another server, please follow these instructions. We will be providing two files (a .zip and a .php file) that you can use to migrate the site:
STEP 1) The first step is to FTP the two files (the .zip AND the .php file) to the root of the site.
- Do NOT extract the zip file, it should be ftp’d zipped.
- Also there shouldn’t be anything else on the root of the site with the exception of a cgibin.
STEP 2) Create a new database and database user and record the information.
STEP 3) Go to http://[urlgoeshere.com]/importbuddy.php
STEP 4) On the first screen it is going to ask for the ImportBuddy password. The password will be: open
STEP 5) From there it will guide you through the process (it’s only a few steps) and it will ask for the database name, username and password that was set up. Once complete, the website will be up and running on the domain.
View PermalinkSending small files over email works great but what happens when you have a large file (over 20 MB) you want to share with us? The best way is to use a cloud storage service and share the files using that service. This works much better than sending the actual file because instead of send us the 20 MB file, you’ll only be sending us a link to download the 20 MB file.
IMPORTANT: Please DO NOT click the SHARE link! There is a much easier way to send files!
Assuming you have a Dropbox account and the large file is in your Dropbox account, follow these steps:
If you are using the Dropbox.com website:
- Go to https://www.dropbox.com/
- Sign in to your account
- Navigate to the file in Dropbox
- Move your mouse over the file and click the little link icon (do NOT click the Share icon), it looks like this:
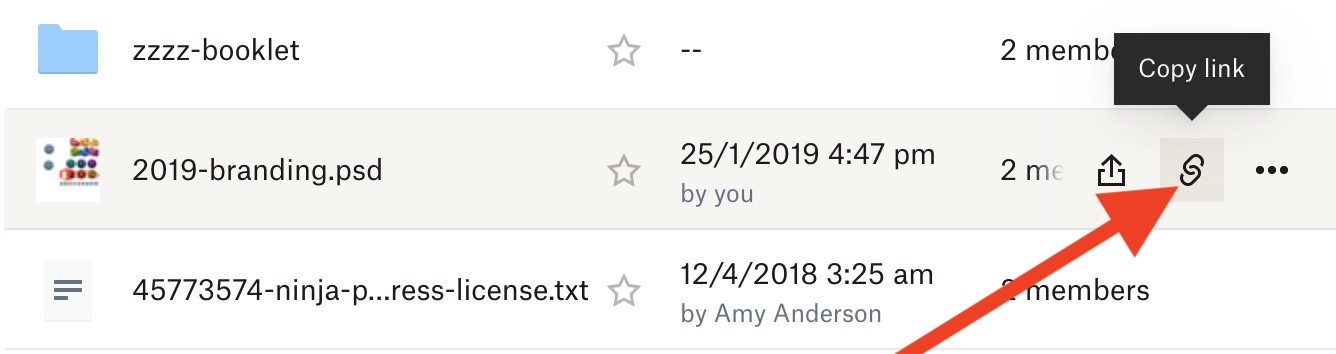
- That will copy the Dropbox link to your clipboard
- Email us the link
If you are using the Dropbox application on your computer:
- Open the Dropbox folder on your computer
- Navigate to the file in Dropbox
- Move your mouse over the file, right click and select the Copy Dropbox Link option, it looks like this:
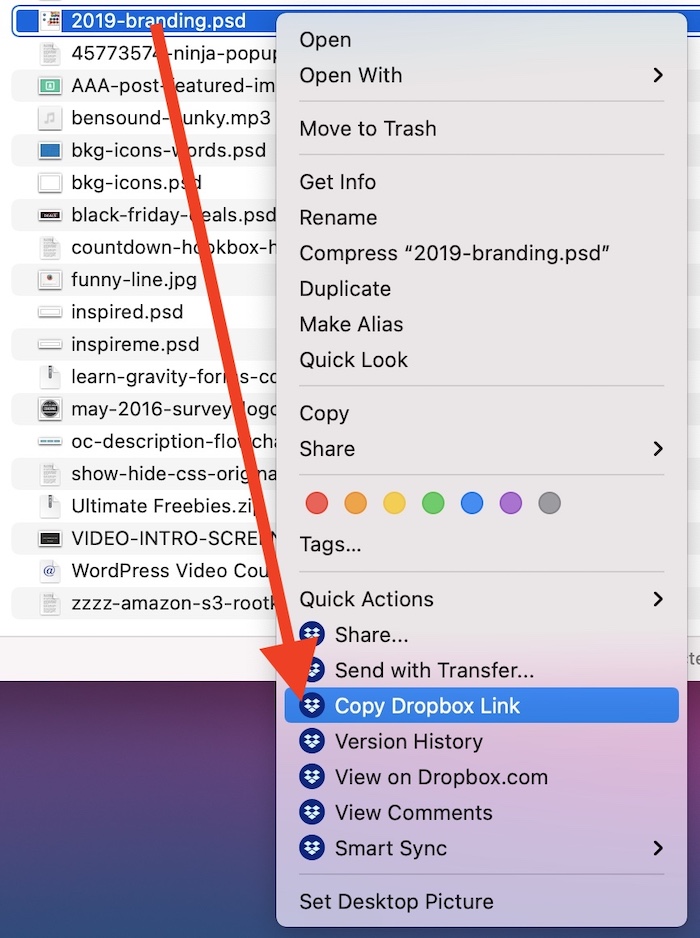
- That will copy the Dropbox link to your clipboard
- Email us the link
NOTE: if you have multiple files you want to send us simply create a folder, put all the files into that folder and then follow the above steps to get the link for that folder.
View PermalinkThe instructions below outline how to point a domain to a Department727 server. It should be noted that the screenshots below are from GoDaddy. Depending on the domain registrar the domain that you will be pointing is registered in, the interface may differ slightly. However, the instructions below should be applicable for most domain registrars.
IMPORTANT: Before pointing a domain, it is important to know if your client has existing email accounts @theirdomain. If they do, it is important to verify that the MX Records (email records) have already been set up in the Advanced DNS settings for their domain. If you are unsure, please contact us and we will let you know how to proceed.
Getting Started
- We will send you two A Records and one CNAME Record for the server. Here is an example of what it will look like (do not use these, they are just examples of the formatting):
- A Record: 12.345.678.90
- A Record: 12.345.678.90
- CNAME Record: wp.wpenginepowered.com
- Login to the domain name registrar (GoDaddy, NetSol, etc.) Once you’re logged in and click on the domain that you want to point.
- After you click on the domain you should see a link called Manage DNS. See example below. Note: it might be worded a little differently depending on the domain registrar).
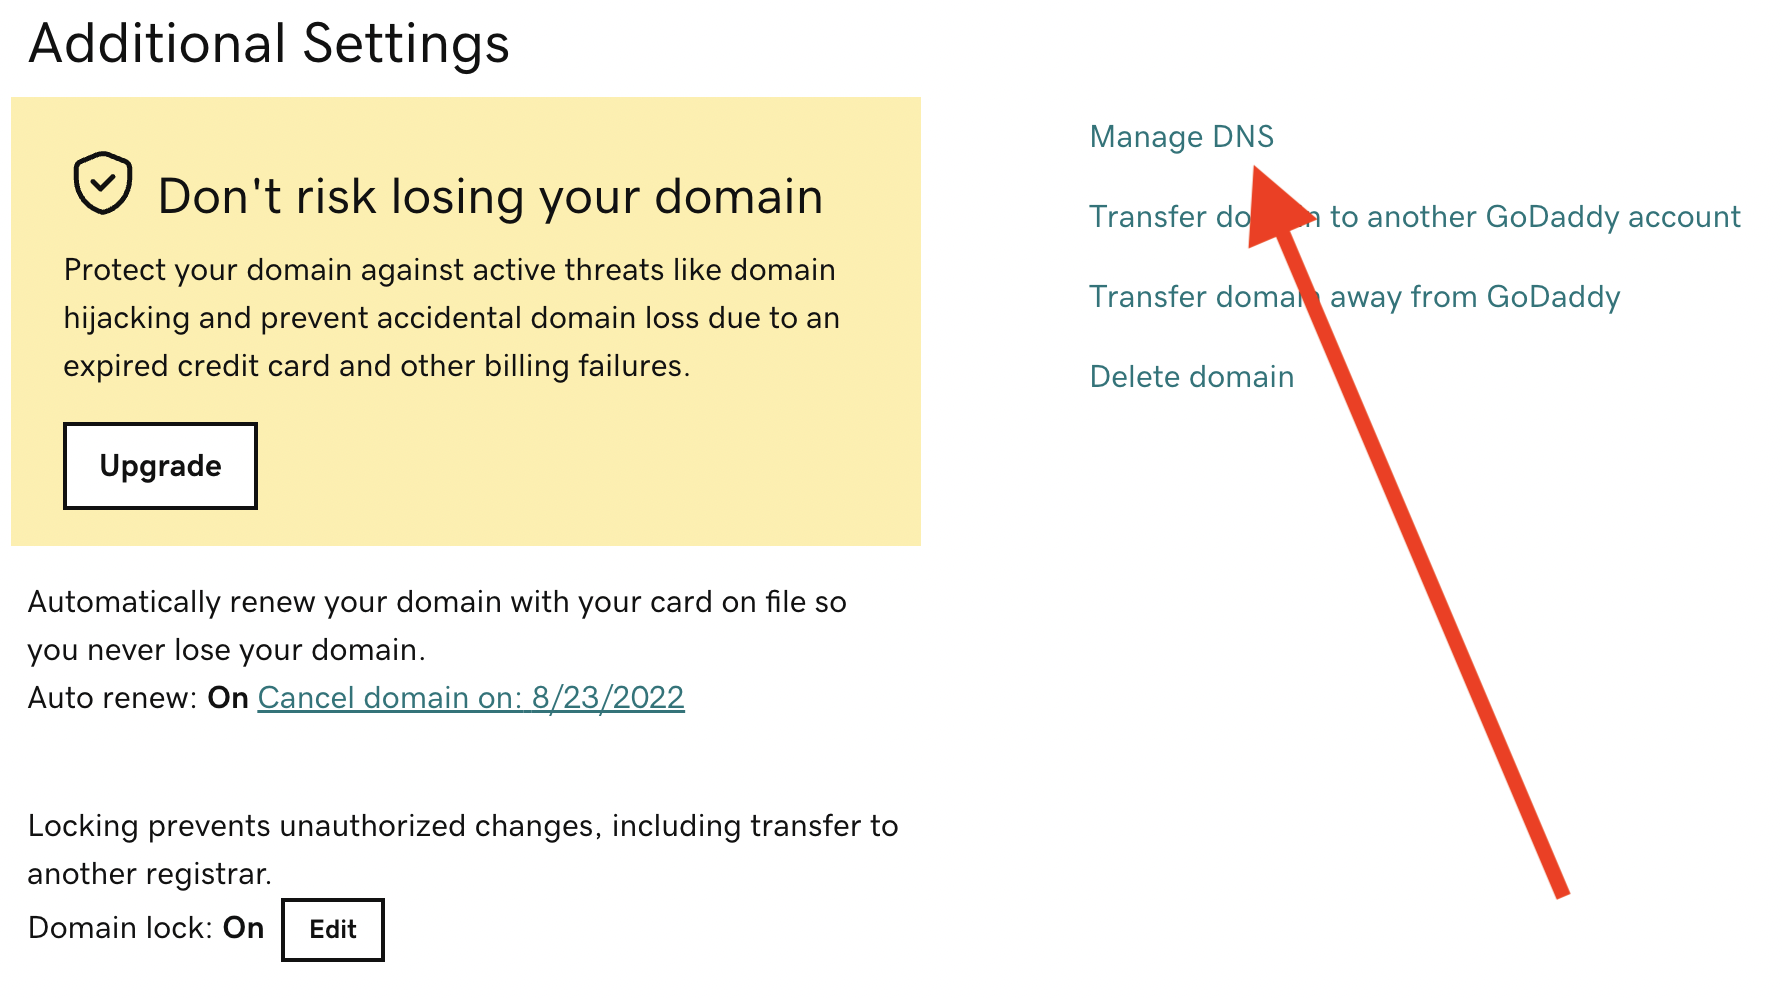
- Click on the Manage DNS link which will take you to the section where you can manage the Advanced DNS records. On this screen you will see a table that consists of rows of DNS records. Within each row there are columns that are typically labeled with headings such as Type, Name, Data and TTL.
- At this you need to find if the domain has existing A Records and CNAME Records. If the domain has these items, you’ll need to EDIT them. If the domain does not have these records, you’ll need to ADD them.
- IMPORTANT: The end result is that you should have two A Records (with the @ as the name) and one CNAME record (with www as the name).
- Follow the instructions below on EDITING and ADDING these records.
Edit An A Record
You want to find the row for the existing A Record. The row for the A Record can be found by looking at the column heading called Type and then look for cell that contains the letter “A” in it. That row will contain the settings for the A Record.
Note: Typically, the A Record is in the first row of the DNS Records (but on occasion can be further down in the table).
IMPORTANT: On occasion a domain does not have an existing A Record. In this scenario, you will need to create two new A Records. If it turns out that the DNS does not already contain any A Records, skip down to the section called Create An A Record.
- Assuming the DNS does have an existing A Record, the next step is to Edit the existing A Record. Click on the Edit button (as indicated in the screenshot below).

- Then delete what is in the Value field and replace it with the first A Record IP Address that we sent to you. To prevent any typos, it’s highly recommend to copy and paste the IP Address in the Value field. Once you have entered the first IP Address, click on the Save button to save your changes.
- With the first A Record updated successfully, now you need to add a new A Record for the second value.
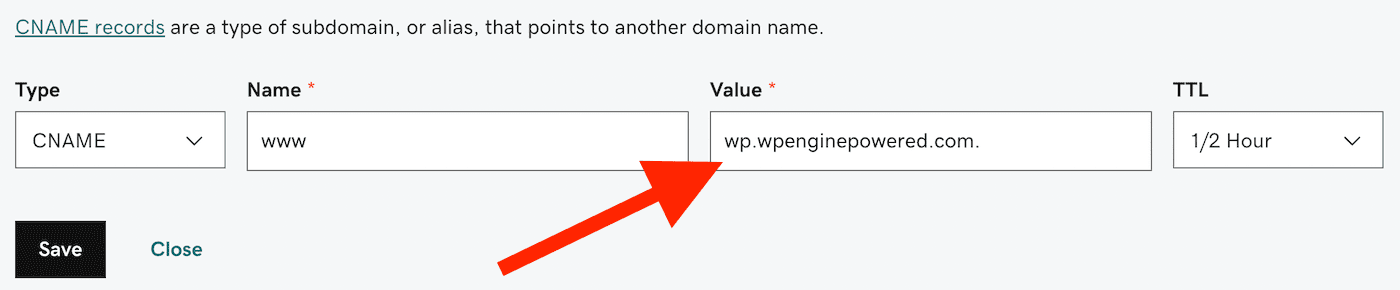
Edit A CNAME Record
You want to find the row for the existing CNAME Record. The row for the CNAME Record can be found by looking at the column heading called Type and then look for cell that contains “CNAME” in it.
IMPORTANT: You’ll probably find that your domain has multiple CNAME Records… find the one that has “www” in the Type field.
- Assuming the DNS does have an existing CNAME Record, the next step is to Edit the existing CNAME Record. Click on the Edit button, sometimes it might be a little pencil (as indicated in the screenshot below).

- Then delete what is in the Value field and replace it with the CNAME Record IP Address that we sent to you. To prevent any typos, it’s highly recommend to copy and paste the IP Address in the Value field. Once you have entered the IP Address, click on the Save button to save your changes.
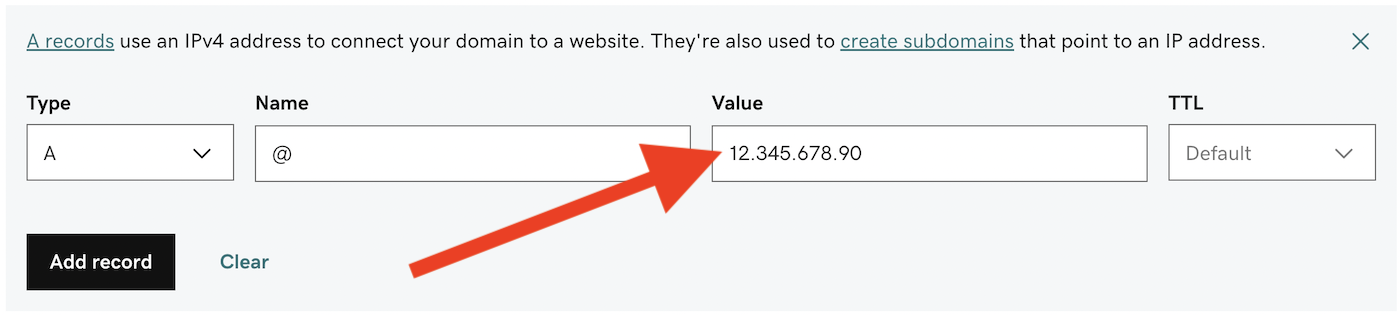
Create An A Record
- You should see a button or a text link that says “Add” or Add Record.” By clicking on that button a dialog box will appear, giving you options to create new DNS record.
- In the Type field select A (this is short for A Record).
- In the Name field, type @.
- In the Value field enter the IP Address that we sent you (it’s best to copy and paste this info into the Value field.)
- Leave TTL set to Default (if that’s not an option, select 1/2 Hour or something similar).
- Once you’ve completed creating the A Record, click the Add record (or Save button)
The end result should look something like this: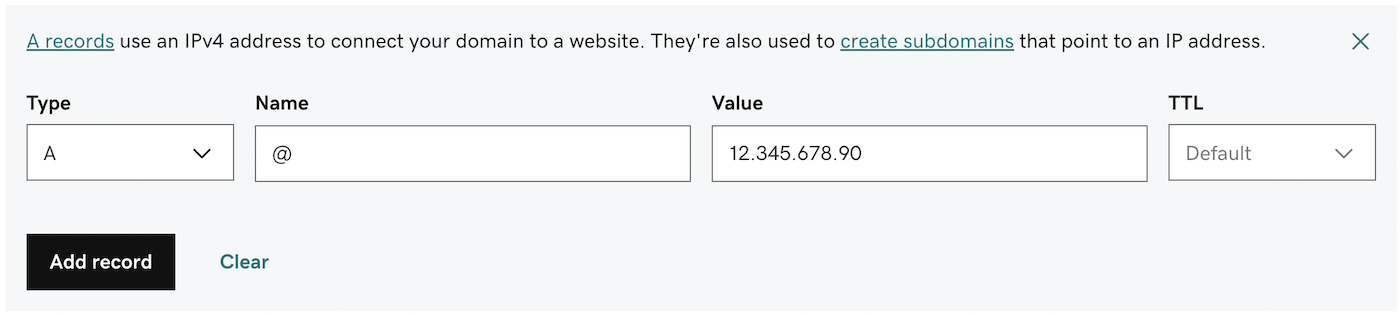
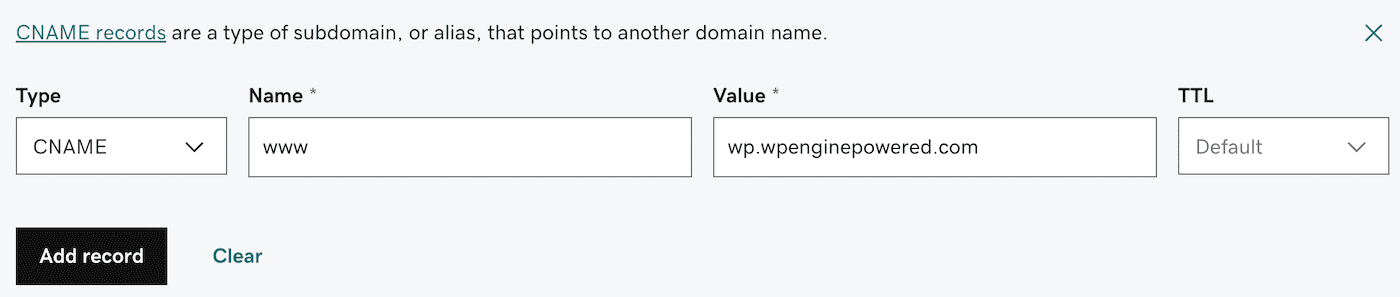
Create a CNAME Record
- You should see a button or a text link that says “Add” or Add Record.” By clicking on that button a dialog box will appear, giving you options to create new DNS record.
- In the Type field select CNAME
- In the Name field, type www
- In the Value field enter the CNAME IP Address that we sent you (it’s best to copy and paste this info into the Value field.)
- Leave TTL set to Default (if that’s not an option, select 1/2 Hour or something similar).
- Once you’ve completed creating the A Record, click the Add record (or Save button)
The end result should look something like this:
Once you have added or updated the two A Records and the one CNAME Record, the end result should look something like this:
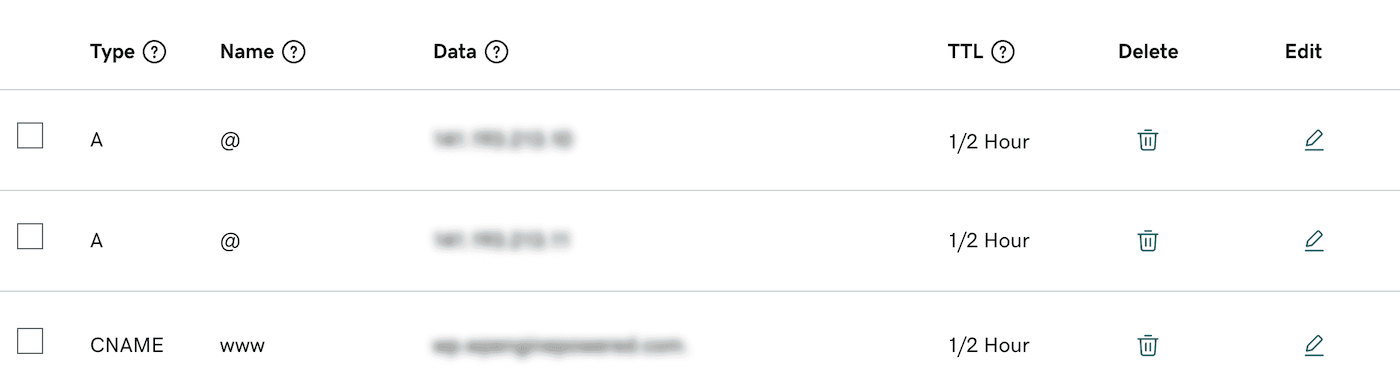
NOTE: On your screen these records will probably be next to each other, you might need to scroll down or change pages to see all three
You are done!
Once you have made these changes, the domain needs need time to propagate. The amount of time this takes can vary between domain registrars. Some domain name registrars recognize domain changes quickly, some take an hour or two and in some cases it can take up to 24 hours.
However, as soon as you have completed the above steps, send us an email letting us know and we’ll take over from here.
View PermalinkThe simple answer is that there is no easy way to know exactly what has changed, however here are a few comments:
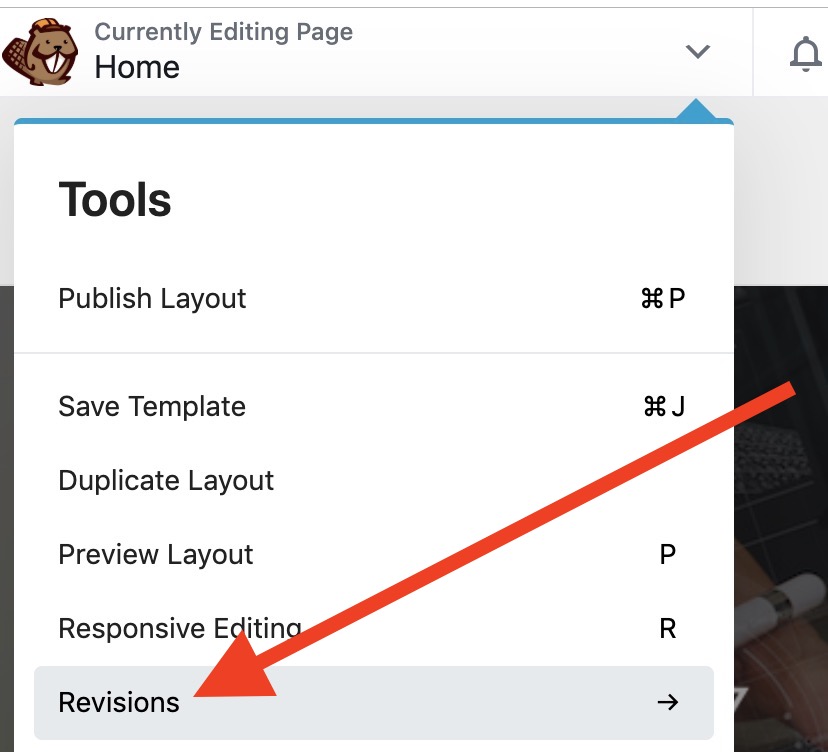
- When you are in Page Builder mode, you can click in the top left “Currently Editing Page” block and one of the options is Revisions (see screenshot below). When you click on that, you’ll see the different versions of that page… it will not highlight anything that was changed from the previous version… it will just show you the entire page as it was. So you’ll need to review every word and every image to see what is different.
- There are also many different places (like Plugin Settings, Posts, Menu entries, Products, etc…) where something could have been changed so you’ll want to look around.
- If you know that this is something you’ll want to know/do often, we could install a plugin LIKE THIS that show the last date and time an item was changed. It will not show you exactly WHAT was changed, it will just let you know when the last time it was changed… which will help you narrow down your research.
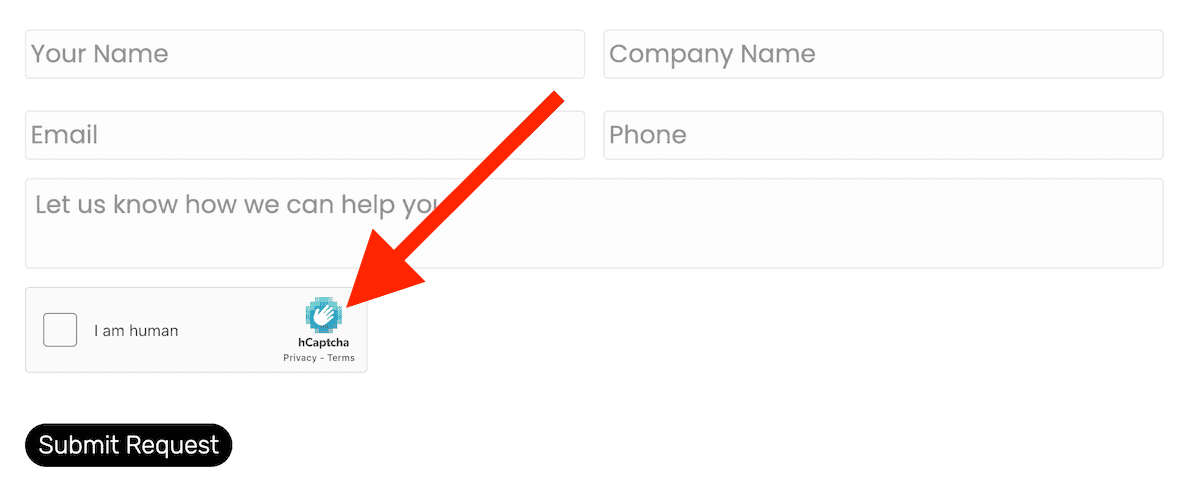
While there is no 100% guaranteed way to stop SPAM form submissions, we have found that hCaptcha seems to work better then reCaptcha. They both essentially do the same thing (they present a group of photos and asks the visitor to click on a certain object like motorcycles or traffic lights) but in our experience, hCaptcha blocks more (not all) SPAM form submissions.
Both are free and do not require you to enter in credit card information.
If we have asked you to create hCaptcha keys, follow these instructions:
1 – Go to https://www.hcaptcha.com/
2 – Click on Sign Up in the top right corner:

3 – You will see a pricing table, in the left hand column it will say Basic (Free), click the Get Started button in that column:

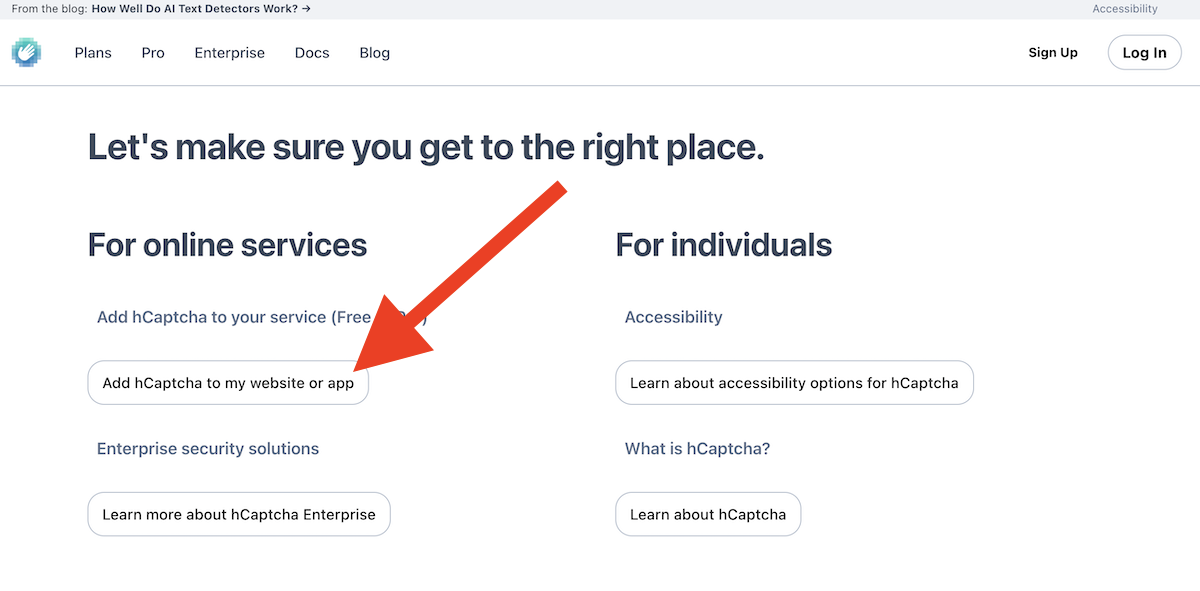
4 – Now you will be at the Signup Options screen, in the left column click the Add hCaptcha to my website or app option:
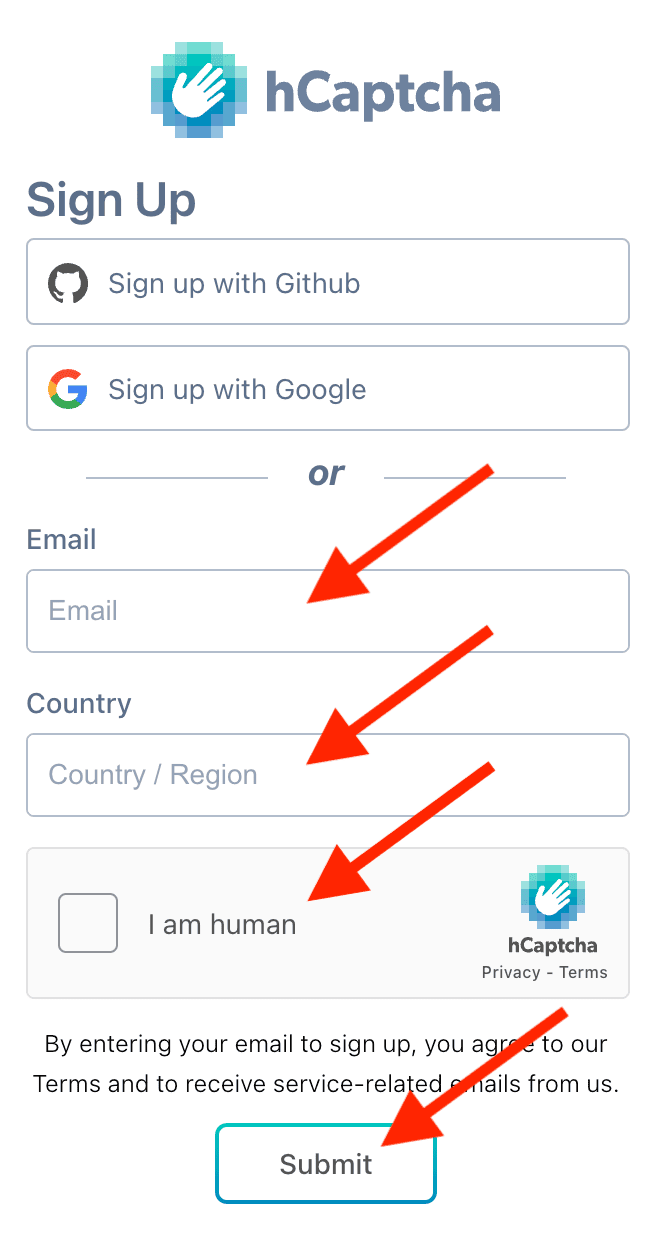
5 – Choose how you want to create your hCaptcha account, the most common option is Email. If you want to use Email to create your account, enter in your email address, select your country and check the I am human box and submit the form. Record this information somewhere safe in case you need to login and create more keys in the future.
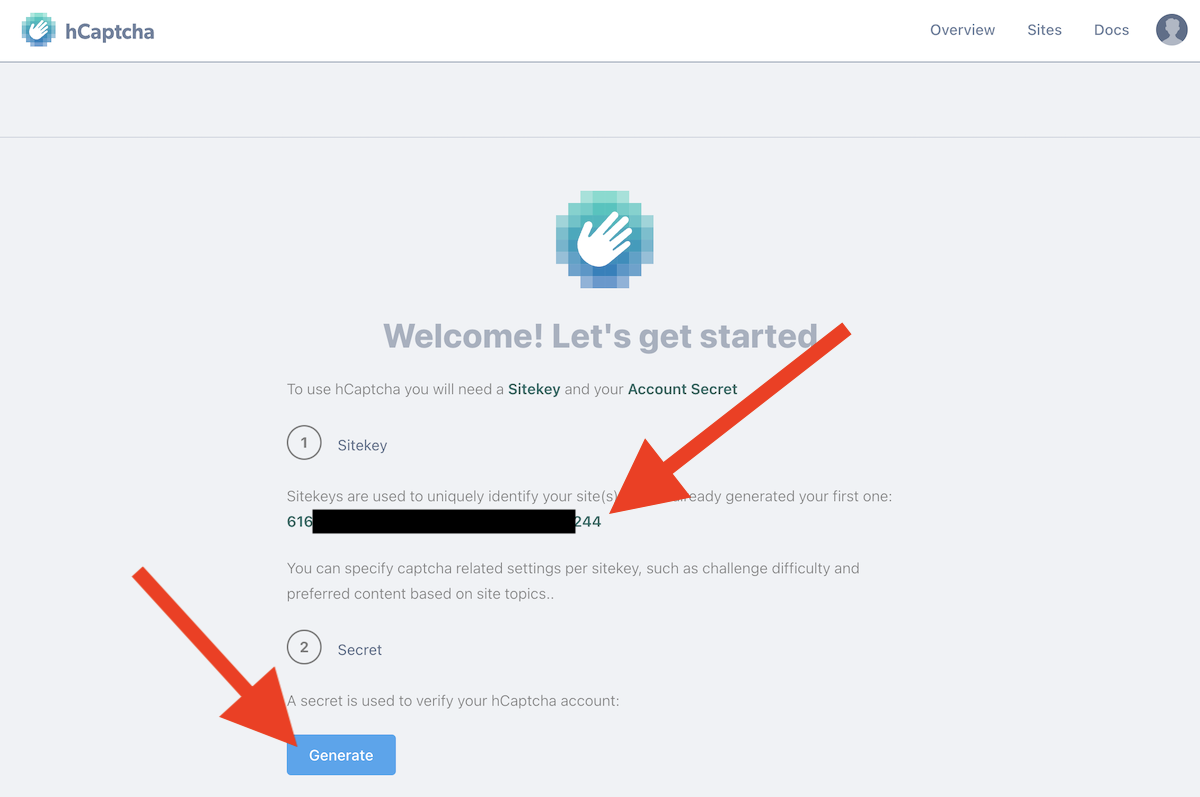
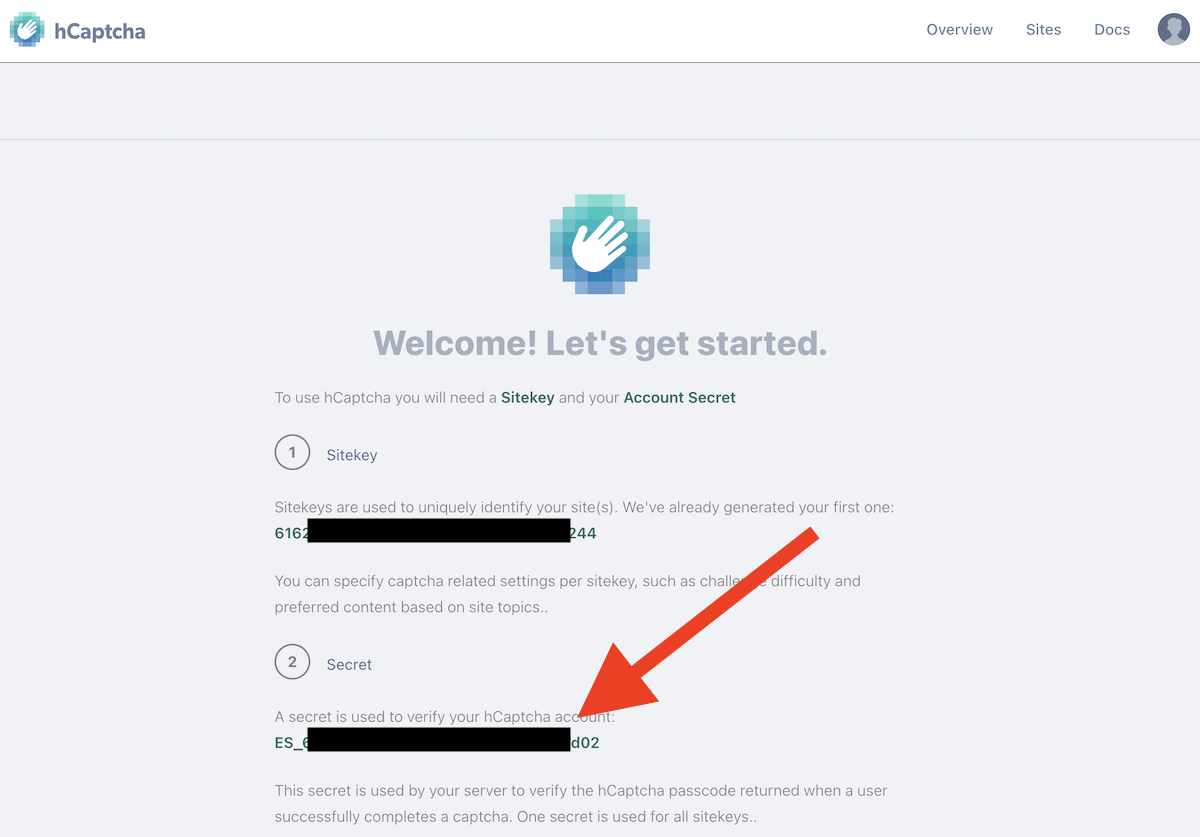
6 – You’ll now see your Site Key, copy and paste that somewhere safe. Then Click the Generate button to get your Secret Key, copy and paste that somewhere safe. Note: We blacked the keys out for this documentation, you will not see the black box when you do this.
7 – Email us (and clearly label) BOTH of the keys you generated, we will use them to configure hCaptcha on the website.
Generating More Keys?
If you’ve created hCaptcha keys in the past, that means you already have an account and if you want to create new keys for a new domain:
- Go to the Sites tab in the dashboard and create a new Site Key.
- Go to the Settings tab in the dashboard and copy your Secret Key.
By default when you publish a blog post, the date assigned to the post is the date that it is published on the website. The posts display on the website based off of the publication date (in chronological order).
However, you can manually change the website publication date associated with the post.
To do this, go to Posts and then mouse over the post title and click on edit. Once you have the post opened, click on Publish. This will open up a calendar where you can select the publication date that you would like associated with the post.
It will look like this:
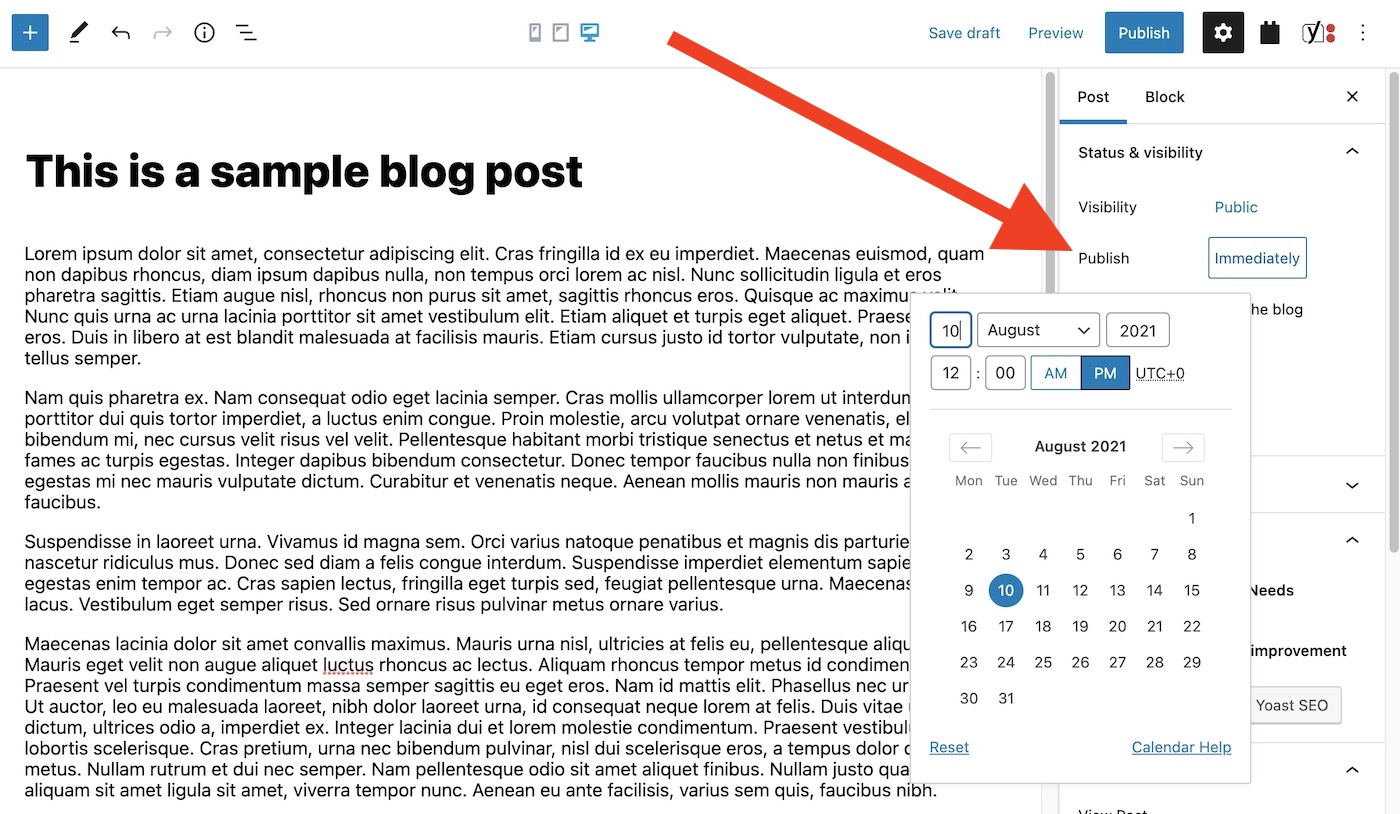
For example, if there is an article that was published in the local newspaper on 8/9/21 and you added it to the site today (but wanted it to match the date of the newspaper) you would open up the calendar and set the publication date to 8/9/21.
View PermalinkIf the site uses Gravity Forms (most do) you can easily check where email notifications are being sent to by following these instructions:
1: Login to the WordPress admin area
2: Click on Forms (left side of screen)
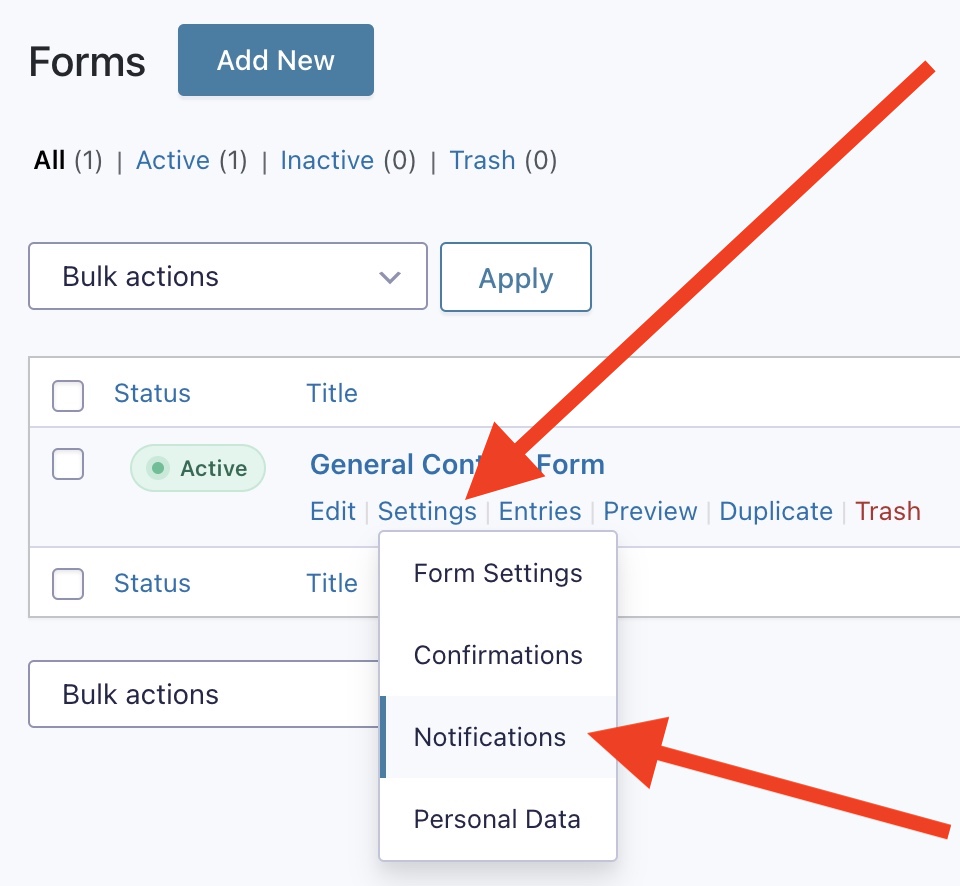
3: Move your mouse over the form you want to check, then Settings and then click on Notifications, like this:
4: Click on the notification called Admin Notification like this:
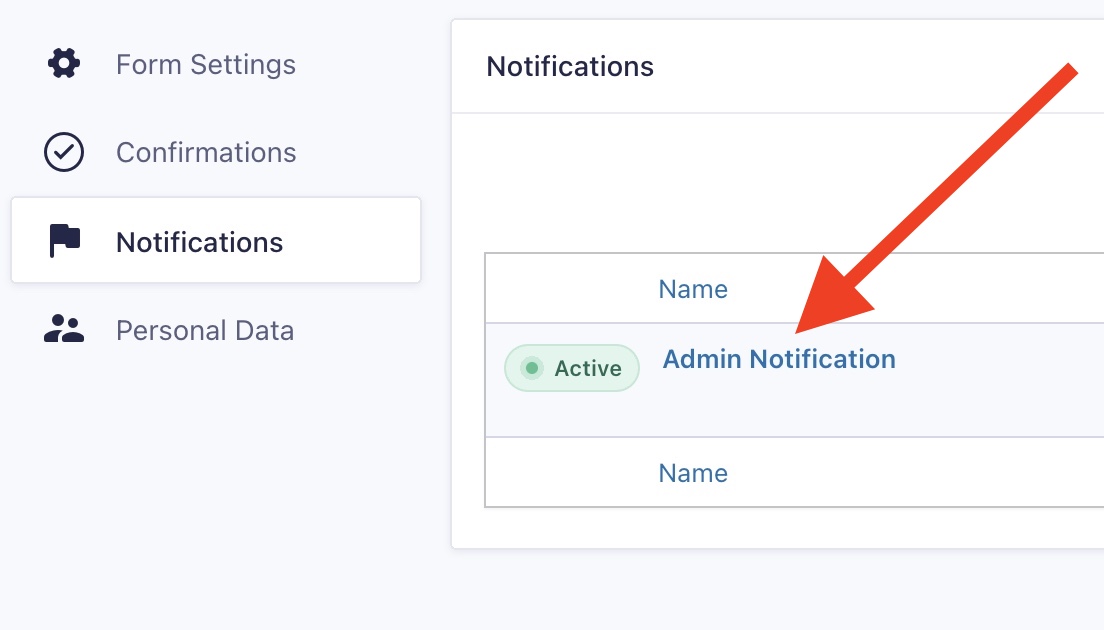
NOTE: If multiple notifications are setup on the form, it might be called something else and you’ll need to check all the notifications
5: The email address(es) that the form is being sent to will appear in the Send to Email box (where you can change it)
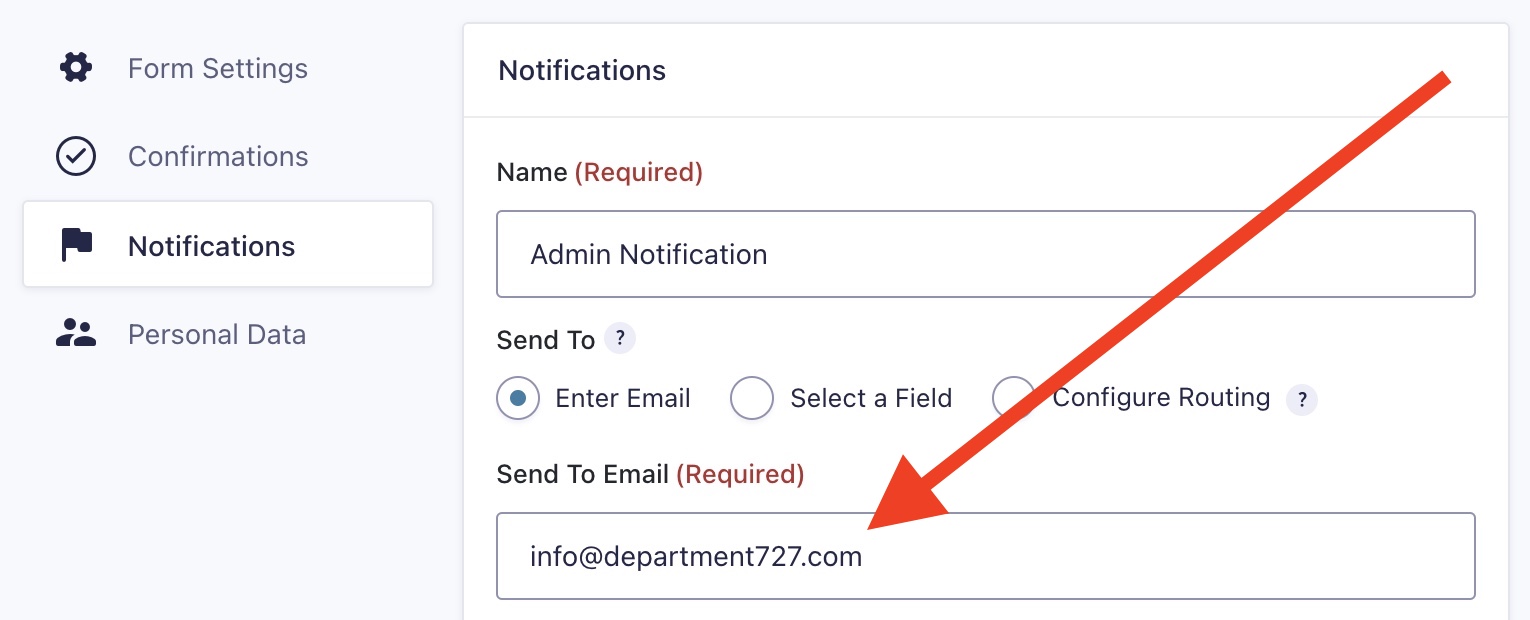
NOTE: You can add multiple email addresses to the Send to Email field… just put a comma in between each email address like this: info@department727.com, amy@department727.com, ian@department727.com
View PermalinkIf you go to your website and instead of seeing the website you see a message that says Forbidden Access, it’s likely that the security plugin installed on your website has blocked your IP Address.
Here’s an example of what the message may look like:

A of the most common reason this occurs is due to a website admin trying to login into the website multiple times with the wrong login credentials. After multiple bad login attempts it raises a red flag that someone maybe trying to hack the site. So as a precautionary measure the security plugin bans the IP Address of the computer that made the bad login attempts from accessing the site.
In some cases the the ban is only temporary but if there continue to be bad login attempts from the same IP Address it will likely result in that IP Address getting permanently banned from accessing the site.
IMPORTANT: It is only the blocked IP Address that can’t see / access the site. The website itself is still up and running for anyone whose IP Address has not been blocked.
There are a few different ways to remove an IP Address from the banned list.
Option 1:
If there is more than one person who has login credentials to the site, the other person who hasn’t been blocked from the site (assuming they are on a different IP Address) can still login to the site. The admin that is able to access the site should login to the site.
The first thing the admin will need is the IP Address of the person / admin that is blocked from the site. If you / they are not sure what their IP Address is simply go to Google.com and type in “What’s My IP Address.” This will display the IP Address at the top of the search results.
Once you know the IP Address, login into the site and click on Security > Settings. This will open up the security settings of the site. You’ll see a section called Banned Users.
In the Banned Users section, click on Configure Settings. Here you will see a list called Banned Hosts. This contains all IP Addresses that have been permanently blocked from the site. Scroll through the list until see you see the IP Address that you want to unblock. Once you find the IP, delete it from the list and then click on Save Settings.
Option 2:
If you are blocked from your website and are the only person with login credentials to the site, if you’re able to use a different network (which uses a different IP Address) then you’ll be able to login to the site on that network. Once logged into the site use the steps outlined in Option 1 above to find your IP Address and remove it from the banned list.
Note: An example of accessing your website on a different network would be to shut wi-fi off on your phone and then launch the site in your phone’s browser.
Option 3:
If you aren’t able to implement option 1 or 2 (or can’t remember what the login credentials for the site), the third option would be to disable the security plugin and manually reset the WP password. These steps need to be implemented through the server of the web host.
There are some technical steps involved with this and if implemented incorrectly or you accidentally delete a file on the server it could result in breaking your website. So we recommend in this scenario that we handle restoring your access to the site (hourly rates apply).
Note: If your site or your clients website is not hosted on one of our servers, please be sure to give us cpanel access to the server.
View Permalink
If you are not hosting with us (you are not paying us for web hosting, you are paying another company for that service) and you are experiencing email problems please contact your web hosting company.
If we are not hosting your website, we cannot help you with any email problems (which are server related).
View PermalinkThe website URL and the admin login URL are not the same thing. Here is some clarification on the two:
- The website URL is what the public type into their browser to visit the website. For example: https://mysite.com
- The admin login URL is what the website owner types in to get to the login screen. Once logged in, the admin can make changes to the website (like changing text, adding photos, etc…). Typically (not always) the admin url is something like: https://mysite.com/wp-admin
Yes, we can provide you any Photoshop artwork that we create for your client in .PSD format (photoshop’s native file format). Just email us at any time to request any artwork files that you would like
View PermalinkWhile we can place any MP4 video as a background of a row, that does not mean that all videos will work as a background of a row. Here are some things to keep in mind when creating a video for the background of a row:
- No words: Make sure that there are NO words anywhere on the video… since the video is being placed in the background of a row, elements will be overlapping various parts of the video potentially hiding those words.
- No audio: Do not add any audio to the video. Background videos do not play audio and having audio in the file will increase the file size.
- Small file size: The video file should be small. How small? There is no law but it should be less than 3 MB but if it had to be bigger, the max would probably be 10 MB. Let’s say that you use a 50MB video on your site and a visitor browses your site on their phones data plan, it will burn through 50 MB of their data!
- No center of focus: The video should not have a center of focus that must be visible at all times. Remember that everyone has different browser sizes and background videos (and images) need to expand/shrink to fill the width of the browser so you cannot ever guarantee that a certain part of the background will always be visible.
There are a few ways to create an interactive map (with location pins) on a website. A low cost way to do this is with Google My Maps. This is a feature from Google that allows anyone to build a map on Google’s website with location pins and then embed that map on a website. This is a great option for maps that don’t need that many location pins.
Below is a sample Google My Maps map with 4 location pins on it, click any pin to see the information about that location. Notice that there is no searching by zip code or current location, the visitor simply moves the map around to find locations.
NOTE 1: Any map will need to be associated with a Google account and we recommend all maps be in the Google account of the actual business (not our Google account).
NOTE 2: Other than changing the color of the location pins + icons and changing the map type (Satellite, terrain, Dark Landmass) there are not many options for changing the look/functionality of the map.
View Permalink